Two years ago, on February 6, 2023, two massive earthquakes hit the south eastern region of Türkiye and the north western region of Syria.
These earthquakes ended up being responsible for over 60,000 deaths.
As I wrote about and gave video updates about, I and a number of friends drove to the earthquake zone, and started providing aid within about 72 hours after the quakes hit. We continued to provide aid in the region for several months after.
For the first several weeks after the quakes, many in the region didn’t have running water. This was causing outbreaks of cholera in the region, as poor disposal of human waste meant feces was getting mixed into the ground water, and eventually into drinking water.
One of our major projects during that time was to design and deploy a sanitation solution that could help alleviate this.
Specifically, we designed a toilet that was simple to produce and deploy, and needed no water to safely dispose of people’s feces and urine.
These dry-composting toilets only needed sawdust (or some other source of carbon, like newspaper, dry leaves, etc.) to be able to safely dispose of human waste.
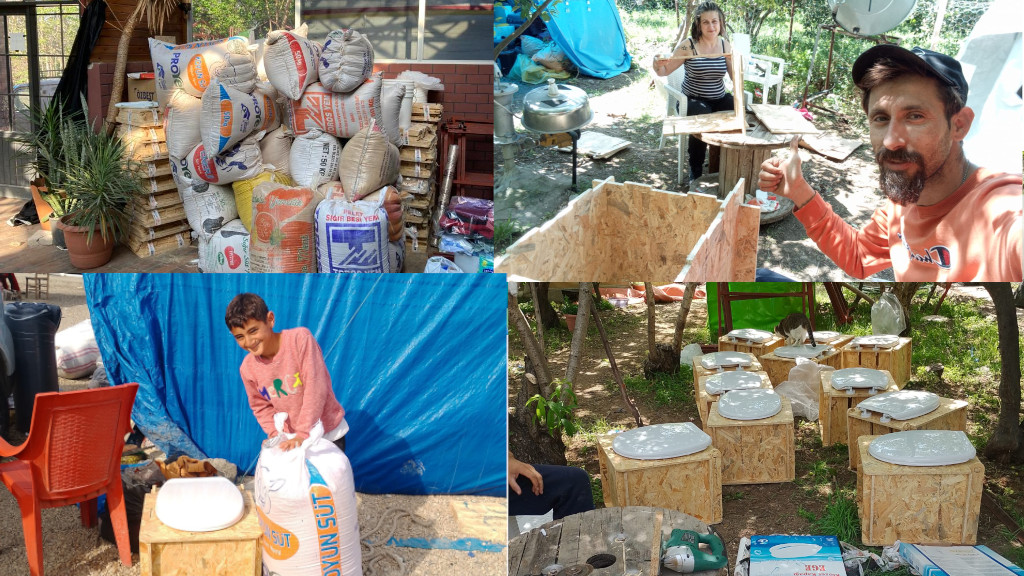
We ended up making and deploying several hundred of these to the earthquake zone, and got our systems in place so well that we could have deployed hundreds more with just a few text messages, if we needed.
However, by the time we got to this point, more permanent sanitation solutions started to be made available in the region, so fewer and fewer people ended up needing these.
I wish we had known how to make these toilets from the first day we landed in the earthquake zone, as we would have been able to help so many more people, and prevented a lot more people from getting sick.
So, I’m writing this post so that anyone else who might be leading similar aid relief in the future has the tools to do it faster than we did!
What did we make?
Basically, we designed an Emergency “Flat Pack” Dry-Composting Toilet System, as pictured below:

A mock up of all CNC'd parts, before assembly

A mock up of the CNC'd parts assembled

A mock up of a completed toilet, with seat attached
(If you don’t know what a CNC machine is, you can watch this video for an explanation).
We went through several design iterations before settling on this design (including, at a couple points, exploring the possibility of injection molding, or just building all these toilets by hand).
In the end, this design, in partnership with a local company that had a large CNC machine, ended up being the best balance we could find of price and simplicity.
The final product was a really solid toilet design, and also something that was really easy to produce and to assemble!
All it took was a few moments of slotting wood pieces into place, screwing on a toilet seat, putting a bucket in the box, and we had a viable toilet!

Our local friends, helping with assembly of several dozen units.
We worked with Christian H. on Upwork to get the designs for these drawn up, and he did a great job of working with us in the midst of our ever-changing design constraints.
Parts list
Every toilet system that we distributed had one of each of the following:
- The CNC’d wooden parts, as shown above. (design files below)
- A standard plastic toilet seat, which screwed into the CNC’d parts with included plastic nuts.
- A 18 liter / ~5 gallon bucket (The ones we got were either 33.5 cm tall, or 27.27 cm tall; Most large-enough plastic buckets would work fine, but you’d just need to make sure that they fit inside the wooden frame, and can hold enough waste. 18 liters was perfect.)
- Roughly 50 kg of Sawdust (I talked a bit about how we got that at the end of this post. I can’t recall off hand how long this would last. I think a small family could use it for about a month, but I don’t remember specifically.)
- A plastic scoop, to be able to shovel the sawdust from its bag to the toilet bucket. (Think, like a popcorn scoop used in movie theaters.)
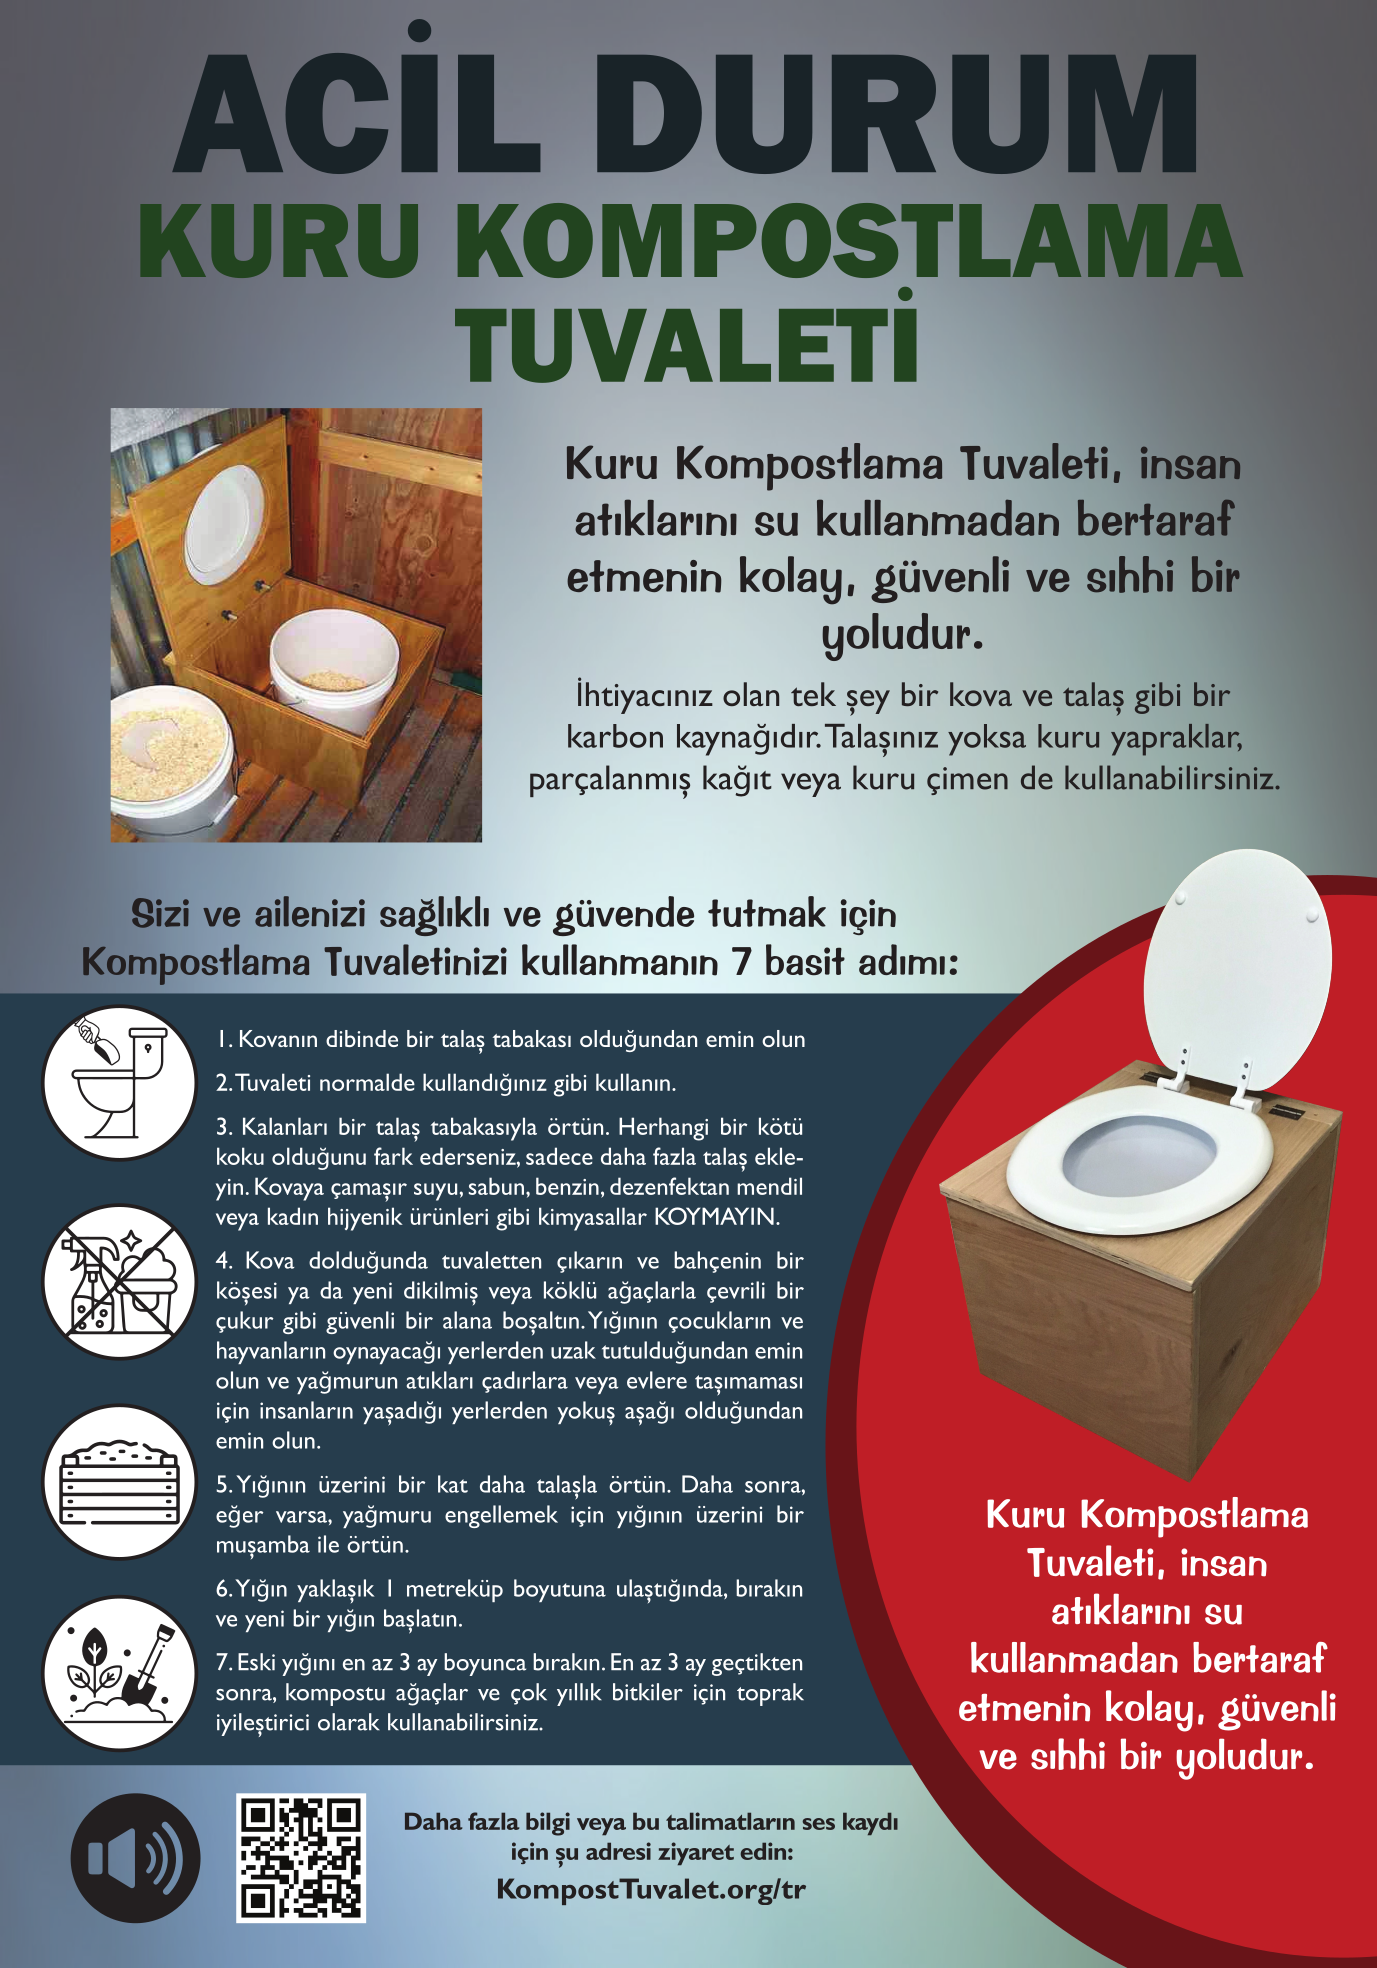
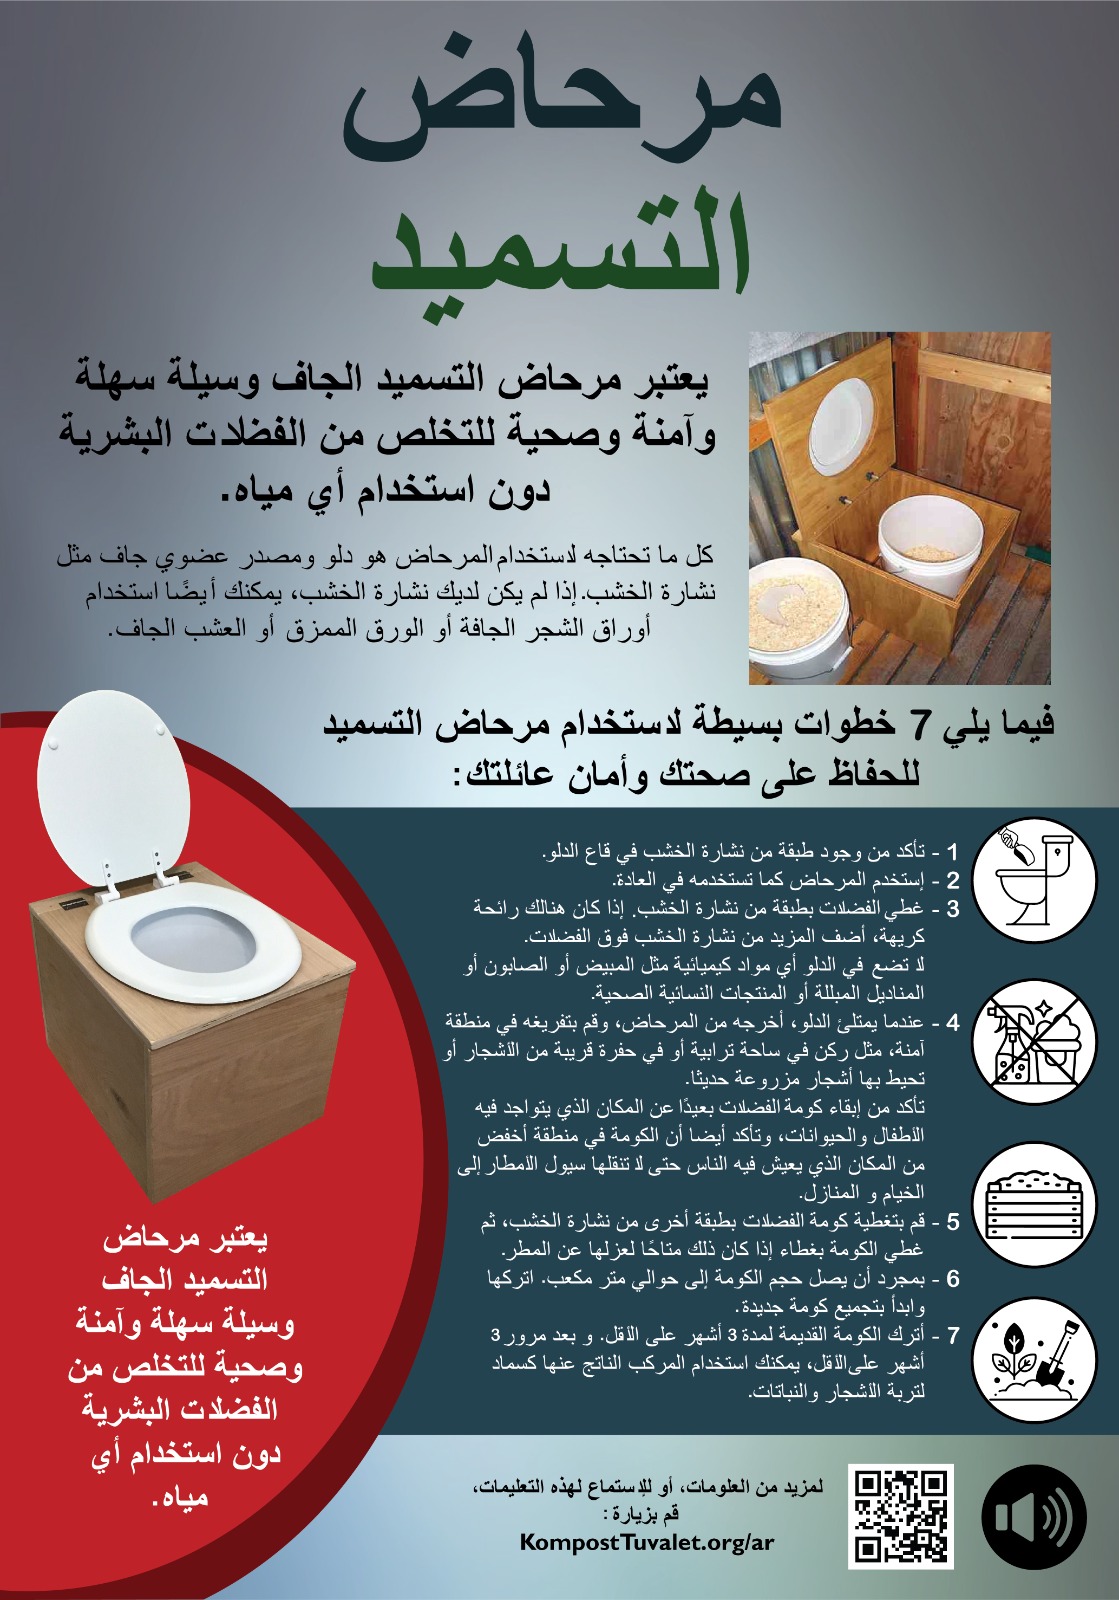
- The poster we designed to show proper and safe usage of the composting toilets. (Also available below. This was important! Pooping in a pile of sawdust and covering that with more sawdust is not something we’re used to. In order to slow and prevent the spread of disease both short-term and long-term, proper understanding of how to use these composting toilets was important. A nicely designed poster was the most scalable way we could think of to make that happen at the time. )
- Optional: We didn’t make a ton of these available until towards the end of our distribution campaign, but if I was doing this again, I would have sent more Standing Privacy Tents with our toilets. Not all recipients needed these, but a number did.
How did we deploy them?
Once we knew what all we needed, the challenge primarily became sourcing the various parts we needed to assemble in order to create a viable toilet experience.
Thankfully, we ended up in contact with a number of men and women from within the Turkish church who were spending their time to help earthquake victims, and happened to be fantastic at logistics. They also had connections with people and companies outside of the earthquake zone.
One of these contacts was able to get us connected with a truck driver, who we were able to commission to transport everything for us.
Another was able to help us source all the parts and pieces listed above.
All in all, the major parts of our task-list for this project consisted of:
- Finding a company with a CNC machine, that could cut the material we needed. (We used OSB wood because it was cheapest at the time. It was less durable, but since this is was just a stopgap solution for just a few weeks/months until running water is restored, we thought it was fine.) We sent them the plans to be cut (available below), and told them how many units they wanted. They gave us a price accordingly.
- Finding a company that could source the buckets and scoops. Most larger hardware stores could do the job; though, I think our contact was actually able to get these directly from an injection moulding company… which is pretty cool.
- Finding a source for the sawdust (or other source of carbon) for the composting toilets. This could have been quite hard, but ended up being a fairly quick find for us. I talk a little about it here.
- Printing the posters to use to explain safe usage of the composting toilets. (Any print shop will do.)
Once all those are in place, then they need to be packed onto a truck, and sent into wherever they’re going to be needed.
The logistics of this was not nothing.
But, once we found good sources for each piece of the puzzle, it became just as easy to deploy 20 toilets as it was to deploy 200 or more!
All you need to deploy them yourself
If you’re in a situation where you need to deploy emergency dry-composting toilets too, I’ve sought to make the process as simple as possible.
Beyond the inventory list above, here are all the things you need to be able to deploy your own emergency dry composting toilets:
Plans for the CNC Machine
Here is a zip file of the blueprints for the toilet frames.
They’re available in PDF and DXF file types.
Assuming you don’t have a background in working with CAD software, then the PDFs will probably be the easiest way for you to view the files.
However, when you find a company with a CNC machine, they’ll most likely prefer to work with the DXF files.
Posters and Audio Explanations
We created posters in 3 different languages, to teach people how to use these toilets.
First, we did it in English, because that was the easiest language for me to write and proofread the text in.
Then, because the two primary languages in the earthquake region was Turkish and Arabic, we also designed posters in Turkish and Arabic.
Here’s the English version:

Our English Training Poster
Also, because there was a high degree of illiteracy among some of the communities we were working with, we also made the explanations available in audio form on the website we set up (KompostTuvalet.org — This site needs a significant redesign. If you’re good at UI and interested in prettying this up, Let’s talk!)
Here’s the files we used for each:
Thanks to Puente Global for doing the design and Turkish translation.
License
All these assets are available under CC BY-NC 4.0 license. That means that you can use and modify them freely and without limitation, as long as you give credit, and as long as you don’t make money from them.
This is designed to help people, so take it and adapt it to that end! Translate them into any language that you’re working in, or make it work in your context however you need!
If you have any questions, feel free to contact me!